زکات علم

زَکاةُ العِلمِ أن تُعَلِّمَهُ عِبادَ اللّه‏ِ امام باقر (ع)
زکات علم

مطالبی در زمینه کامپیوتر و علاقه مندی های شخصی من مطالب این وبلاگ غالبا مطالبی ست که در جای جای اینترنت کتاب یا دانشته های شخصی خودم می باشد که به عنوان مرجعی برای رجوع دوباره در اینجا جمع آوری شده اند .
ehsunitd.ir personal website

پیوندها

۳۵ مطلب در مهر ۱۳۹۲ ثبت شده است

این ماسک را شاید همه شما بشناسید، ماسک گروه آنونیموس. ولی بعید است عده زیادی بدانند که تاریخچهٔ این نقاب جذاب چیست و از کجا آمده. بنابراین پیش از آنکه به خودِ آنونیموس و فعالیت های آنها در زمینه هک بپردازیم، در بخش اول از این مقاله سه بخشی، داستان جذاب شکل‌گیری این ماسک -به شکلی که امروزه می‌شناسیم- را برای شما تعریف می‌کنیم. 

  • ehsan gholami

اگر شما هم با لپ تاپ خود با یک سیستم عامل لینوکسی به طور مستقیم و بدون ابزار های مجازی سازی کار میکنید . جالب است بدانید همانطور که در ویندوز شما قابلیت سوییچ کردن بین کارت گرافیک اصلی و قدرتمند خود و کارت گرافیک onborad خود در لینوکس هم شما میتوانید با نصب یک پکیج با حجم تقریبی 50 مگ به مدیریت کارت گرافیک خود بپرازید

Description

Nvidia Optimus is an optimization technology created by Nvidia which, depending on the resource load generated by client software applications, will transparently and seamlessly switch between two graphics adapters within a computer system in order to provide either maximum performance or minimum power draw from the system's graphics rendering hardware. From Bumblebee's FAQ: Bumblebee is a effort to make Nvidia Optimus enabled laptops work in GNU/Linux systems. Such feature involves two graphics cards with two different power consumption profiles plugged in a layered way sharing a single framebuffer.

Install Dependencies

su -c "yum install -y libbsd-devel libbsd glibc-devel libX11-devel help2man autoconf git tar glib2 glib2-devel kernel-devel kernel-headers automake gcc gtk2-devel"

You also need to install VirtualGL. Download the latest version for your arch at the VirtualGL download page or use yum command

 yum install VirtualGL 

If you want to run 32 bit apps on your 64 bit system, then also install:

 yum install VirtualGL.i686 

Install Bumblebee

Install the Bumblebee yum repository

Fedora 17

yum -y --nogpgcheck install http://install.linux.ncsu.edu/pub/yum/itecs/public/bumblebee/fedora17/noarch/bumblebee-release-1.0-1.noarch.rpm

Fedora 18

yum -y --nogpgcheck install http://install.linux.ncsu.edu/pub/yum/itecs/public/bumblebee/fedora18/noarch/bumblebee-release-1.0-1.noarch.rpm

Fedora 19

yum -y --nogpgcheck install http://install.linux.ncsu.edu/pub/yum/itecs/public/bumblebee/fedora19/noarch/bumblebee-release-1.0-1.noarch.rpm

Now install Bumblebee:

yum -y install bbswitch bumblebee

Bumblebee with the NVIDIA proprietary drivers

The previous commands install bumbleblee with the nouveau drivers. If you want to install bumblebee with the NVIDIA proprietary drivers you must also follow these instructions:

Install the bumblebee-nonfree repository:

Fedora 17

yum -y --nogpgcheck install http://install.linux.ncsu.edu/pub/yum/itecs/public/bumblebee-nonfree/fedora17/noarch/bumblebee-nonfree-release-1.0-1.noarch.rpm

Fedora 18

yum -y --nogpgcheck install http://install.linux.ncsu.edu/pub/yum/itecs/public/bumblebee-nonfree/fedora18/noarch/bumblebee-nonfree-release-1.0-1.noarch.rpm

Fedora 19

yum -y --nogpgcheck install http://install.linux.ncsu.edu/pub/yum/itecs/public/bumblebee-nonfree/fedora19/noarch/bumblebee-nonfree-release-1.0-1.noarch.rpm

Make sure you have glibc-devel installed because it is needed for bumblebee-nvidia to compile the driver

sudo yum install glibc-devel

Now install bumblebee-nvidia

yum -y install bumblebee-nvidia

"bumblebee-nvidia" is both a rpm package and a shell script. The "bumblebee-nvidia" package contains the shell "wrapper" script, init scripts to run it at bootup, and a SELinux security policy, and lastly a copy of the NVidia Linux binary driver "blob" downloaded from NVidia's UNIX drivers page. This is why the packages are so large compared to the bumblebee package.

Reboot.

Testing Bumblebee

If you want to make sure you have bumblebee up and running, write:

optirun glxgears -info

You should see some gears rotating, and in the terminal you should see "GL_VENDOR = NVIDIA Corporation" or something similar.

Primus

For speed imrovements you can use primus. Primus is a shared library that provides OpenGL and GLX APIs and implements low-overhead local-only client-side OpenGL offloading via GLX forking, similar to VirtualGL. It intercepts GLX calls and redirects GL rendering to a secondary X display, presumably driven by a faster GPU. On swapping buffers, rendered contents are read back using a PBO and copied onto the drawable it was supposed to be rendered on in the first place. Currently primus requires the NVIDIA proprietary drivers.

Install primus:

yum install primus 

If you want to run 32 bit apps on your 64 bit system, then also install:

yum install primus.i686

Testing primus

Open up a terminal and run:

PRIMUS_VERBOSE=2 optirun -b primus glxgears -info

If primus is working properly, you should see "primus: profiling:" messages every so often in the terminal you ran it from.

How to use Bumblebee

General Usage:

optirun [options] <application> [application-parameters]

If you installed primus, then you can use the following command to take advantage of it:

optirun -b primus <application> [application-parameters]

Start Windows applications:

optirun wine <windows application>.exe

with primus:

optirun -b primus wine <windows application>.exe

By default, primus renders up to 60 fps. To render more frames per second:

vblank_mode=0 optirun -b primus <application> [application-parameters]

In practice this will probably only waste power, as most screens do not display more than 60 frames per second.

You can always run "man optirun" for more information.

  • ehsan gholami

Installing GRUB natively

گراب فایلیست همانند فایل boot در ویندوز که به دلیل پاک شدن یا ایجاد مشکل در آن سیستم بالا نمی آید و برای حل مشکل میتوان با rescue mode به داد سیستم رسید در اینجا توضیحی مبنی بر این که به احیای سیستم بپردازیم پرداخته شده است . در بخش اول با تغییر روت سیستم باعت برگرداندن دستورات و مسیر ها میشویم در بخش دوم نصب فایل گراب در ابتدای هارد برای بوت شدن سیستم

بخش اول

red Hat Enterprise Linux 6 – How to restore Grub.
1. Boot from RHEL6 DVD.
2. Select “Rescue installed system”.
3. Choose -> Language, Keyboard, and Rescue Method. Select “Local CD\DVD” for the Rescue Method.
4. Setup Networking -> Yes or No, doesn’t matter for restoring Grub.
5. Next on the “Rescue Screen”, select Continue and OK twice.
6. Next on the “First Aid Kit quickstart menu”, select “shell Start shell”.
The prompt will start:
Starting shell…
bash-4.1#
7. Type: “chroot /mnt/sysimage”
8. Type: “cd /boot/grub”
9. Type: “fdisk -l” to see where hd0.
10. Restore Grub, type: “grub-install /dev/sda1”
If No error, it should display:
# this device map was generated by anaconda
(hd0) /dev/sda
 

بخش دوم

Caution: Installing GRUB's stage1 in this manner will erase the normal boot-sector used by an OS.

GRUB can currently boot GNU Mach, Linux, FreeBSD, NetBSD, and OpenBSD directly, so using it on a boot sector (the first sector of a partition) should be okay. But generally, it would be a good idea to back up the first sector of the partition on which you are installing GRUB's stage1. This isn't as important if you are installing GRUB on the first sector of a hard disk, since it's easy to reinitialize it (e.g. by running `FDISK /MBR' from DOS).

If you decide to install GRUB in the native environment, which is definitely desirable, you'll need to create a GRUB boot disk, and reboot your computer with it. Otherwise, see Installing GRUB using grub-install.

Once started, GRUB will show the command-line interface (see Command-line interface). First, set the GRUB's root device1 to the partition containing the boot directory, like this:

     grub> root (hd0,0)

If you are not sure which partition actually holds this directory, use the commandfind(see find), like this:

     grub> find /boot/grub/stage1

This will search for the file name/boot/grub/stage1and show the devices which contain the file.

Once you've set the root device correctly, run the commandsetup(see setup):

     grub> setup (hd0)

This command will install the GRUB boot loader on the Master Boot Record (MBR) of the first drive. If you want to put GRUB into the boot sector of a partition instead of putting it in the MBR, specify the partition into which you want to install GRUB:

     grub> setup (hd0,0)

If you install GRUB into a partition or a drive other than the first one, you must chain-load GRUB from another boot loader. Refer to the manual for the boot loader to know how to chain-load GRUB.

After using the setup command, you will boot into GRUB without the GRUB floppy. See the chapter Booting to find out how to boot your operating systems from GRUB.

  • ehsan gholami
Boot failure : No DEFAULT or UI configuration directive found Error
Reason for the Error :

Generally the iso image that are intended to be burned and booted from CD/DVD has all the files required for Boot in the “ISOLINUX” folder. Whereas the iso images that are intended to be run from USB has all the files required for boot in the “SYSLINUX” folder. So when you try to burn and boot a CD/DVD iso from USB, it cannot recognize the type of boot medium as it will not have “syslinux” folder it will simply give “Boot failure : No DEFAULT or UI configuration directive found“.
Solution for the Error :

Open the USB installation media, then rename the following:

isolinux –&gt; syslinux (folder)
isolinux.bin –&gt; syslinux.bin
isolinux.cfg –&gt; syslinux.cfg
  • ehsan gholami

Sparse file

From Wikipedia, the free encyclopedia
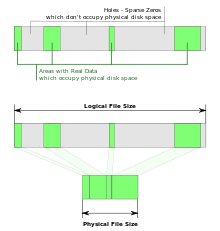
A sparse file: The empty bytes don't need to be saved, thus they can be represented by metadata.

In computer science, a sparse file is a type of computer file that attempts to use file system space more efficiently when blocks allocated to the file are mostly empty. This is achieved by writing brief information (metadatarepresenting the empty blocks to disk instead of the actual "empty" space which makes up the block, using less disk space. The full block size is written to disk as the actual size only when the block contains "real" (non-empty) data.

When reading sparse files, the file system transparently converts metadata representing empty blocks into "real" blocks filled with zero bytes at runtime. The application is unaware of this conversion.

Most modern file systems support sparse files, including most Unix variants and NTFS.[1] Apple's HFS+ does not provide for sparse files, but in OS X, the VFS layer supports storing them in any supported file system, including HFS+. Sparse files are commonly used for disk imagesdatabasesnapshots, log files and in scientific applications.

Contents

  • 1 Advantages
  • 2 Disadvantages
  • 3 Sparse files in Unix
    • 3.1 Creation
    • 3.2 Detection
    • 3.3 Copying
    • 3.4 Piping
  • 4 See also
  • 5 References
  • 6 External links

Advantages

The advantage of sparse files is that storage is only allocated when actually needed: disk space is saved, and large files can be created even if there is insufficient free space on the file system. This also reduces the time of the first write as the system doesn't have to allocate blocks for the "skipped" space. Since initial allocation usually requires the system to write all zeros to the space, it also keeps the system from having to write over the "skipped" space twice.

Disadvantages

Disadvantages are that sparse files may become fragmented; file system free space reports may be misleading; filling up file systems containing sparse files can have unexpected effects (such as disk-full or quota-exceeded errors when merely overwriting an existing portion of a file that happened to have been sparse); and copying a sparse file with a program that does not explicitly support them may copy the entire, uncompressed size of the file, including the zero sections which are not allocated on disk—losing the benefits of the sparse property in the file. Sparse files are also not fully supported by all backup software or applications. However, the VFS implementation sidesteps the prior two disadvantages. Loading executables on Windows (exe or dll) which are sparse takes a much longer time, since the file cannot be memory mapped and not cached.

Sparse files in Unix

Sparse files are typically handled transparently to the user. But the differences between a normal file and sparse file become apparent in some situations.

Creation

The Unix command

dd of=sparse-file bs=1k seek=5120 count=0

will create a file of five mebibytes in size, but with no data stored on disk (only metadata). (GNU dd has this behaviour because it calls ftruncate to set the file size; other implementations may merely create an empty file.)

Similarly the truncate command may be used, if available:

truncate -s 5M <filename>

Detection

The -s option of the ls command shows the occupied space in blocks, and -k the apparent size in blocks too:

ls -lks sparse-file

-h can be used to print both in human readable format.

Alternatively, the du command prints the occupied space, while ls prints the apparent size. The option --block-size=1 prints the occupied space in bytes instead of blocks, so that it can be compared to the ls output:

du --block-size=1 sparse-file
ls -l sparse-file

Copying

Normally, the GNU version of cp is good at detecting whether a file is sparse, so

cp sparse-file new-file

creates new-file, which will be sparse. However, GNU cp does have a --sparse=WHEN option.[2] This is especially useful if a file containing long zero blocks is saved in a non-sparse way (i.e. the zero blocks have been written out to disk in full). Disk space can be saved by doing:

cp --sparse=always file1 file1_sparsed

Some cp implementations, like FreeBSD's cp, do not support the --sparse option and will always expand sparse files. A partially viable alternative on those systems is to use rsync with its own--sparse option[3] instead of cp. Unfortunately --sparse cannot be combined with --inplace, so rsyncing huge files across the network will always be wasteful of either network bandwidth or disk bandwidth.[citation needed]

Piping

cat somefile | cp --sparse=always /proc/self/fd/0 new-sparse-file
  • ehsan gholami