نصب وردپرس بر روی کامپیوتر شخصی یا Localhost
- ۰ نظر
- ۳۱ شهریور ۹۳ ، ۲۰:۲۸
نصب وردپرس بر روی کامپیوتر شخصی یا Localhost

This great broken glass effect can be used for creating effective text effects for your websites or logos. The broken glass effect is relatively simple to create. Throughout this tutorial, I will teach you the skills needed to create this cool effect in Adobe Illustrator.
The first step is to get a strong headline font – the typeface that you will see in a newspaper or comic book. I went for the font “Bebas” in this example, which can be downloaded for free here. Now type out your text, preferably in two separate text boxes, positioned beneath each other. I find it helps to decrease the tracking (the distance between characters) to create a more compact logo. (This setting can be found under the Character toolbox). I decreased the tracking to -50, shown below. This will help the broken glass effect become more prominent.

To create a bolder and more comical effect, try selecting individual characters and modifying their font size, as I did shown below.

Before you can start applying path effects to the text, you have to convert it to an object. You can do this by selecting the text and clicking Object > Expand. Once you do this you will no longer be able to change the text or font. Now you can start cutting up the text into pieces. Create a new layer and start drawing triangles with the pen tool where you would like the glass fractures to be, as shown below.

Now, select a triangle shape and click on Object > Path > Divide Objects Below. Do this for every triangle segment. Unfortunately, you can’t do this by selecting them all at the same time, though it won’t take long to do them one by one. When you have finished you will notice all the triangles will have disappeared and you will be left with your original text spliced up. In order to edit or move the individual selections, you will need to ungroup the selection as shown below.

Now, you can begin to start selecting the individual fragments and moving them apart. Try adjusting the size of the fragments and nudging them outwards using the cursor keys. You can also try rotating them slightly to add a more scattered look. If the shards of “glass” appear too close together or overlaps too much, you can try adding a white stroke to the outline to try separate them visually. Secondly, you can try breaking up the logo more using circular lines similar to the steps above, to create a more realistic broken glass look. You should come up with something as shown below.

Tweak around with your design until you are happy with the overall look, and don’t be afraid to experiment. Try incorporate this effect into your logos – it can look really effective if only applied to one or two words in your logo – especially if you would like to portray a “smashing” or “heavy impact” connotation to your brand.
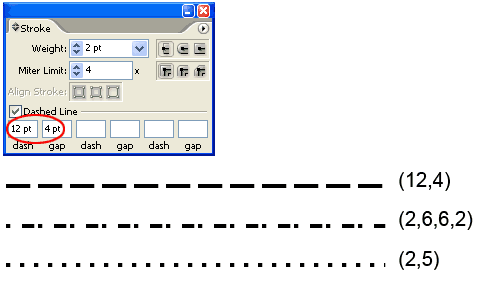
You can get interesting dotted lines with your Stroke Palette. Open up your Stroke Palette from Window>Stroke. Draw a line and select it. Enter the dash and gap value as shown. Experiment with different dash and gap values for different effects. To create a square dotted line, make sure the dash and weight is the same value.

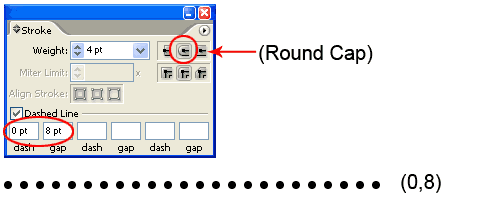
So how about circle dotted lines? Here’s the trick. Select the Round Cap and make sure dash is set to 0 pt. For gap enter a value twice the stroke weight. This will give you a nice circle dotted lines.

Bonus Tip: To expand the dotted lines, you realise Object>Expand doesn’t work. Choose Object>Flatten Transparency to expand it. You can now fill each dots with different colors.
Under Windows XP SP2, it is possible to enable or disable the firewall with the following command lines.
First open the command prompt: (Windows + R keys) and type : cmd
netsh firewall set opmode disable
netsh firewall set opmode enable
It is also possible to create a batch file (with extension. Bat) incorporating one of these command to enable or disable the firewall by simply double-clicking.
You can create a batch file to enable or disable the firewall by double-clicking on Notepad and inserting one of two lines above, then saving the file with the .bat extension (ex: Activatefirewall.BAT).
To go further you can create two files on the desktop, to enable and disable the firewall:
netsh firewall set opmode disable
netsh firewall set opmode enable